Classic Mitered Corner Napkins: Elevating Everyday Elegance

Update: New Fabric
When it comes to adding a touch of sophistication to your dining experience, nothing beats the timeless charm of classic mitered corner napkins. Elevate your table settings with this simple yet elegant sewing project. In this tutorial, we’ll guide you through creating beautiful napkins, and we’re excited to introduce some new fabric choices that will make your creations truly stand out.
Update: More New Fabric
Dive into the world of textiles with our expanded fabric selection. From cotton blends to seersucker, find the perfect material to suit your style. We understand the allure of a favorite fabric shop, and with 1-1/4 yards of carefully chosen fabric, you’ll be ready to embark on this delightful sewing adventure.
Materials
- 1-1/4 yards fabric
- A erasable fabric marker
- Quilting ruler
- Iron
- Presser foot
- Fabric pen
- Sewing machine
Size
Choose the size of your napkins based on your preference. Whether it’s 19-inch dinner napkins or smaller lunch napkins, the finished dimensions are entirely customizable. This project is perfect for beginners, allowing you to create a bunch of napkins in no time.
Notes
Before we dive into the pattern and sewing techniques, let’s explore some key notes. Understanding the importance of a crisp fold, a 1-inch double fold, and a precise 45-degree angle will set the foundation for creating lovely, mitered corners.
Pattern
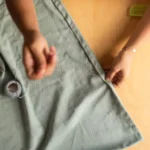
- Lay out a square of fabric.
- Use an erasable fabric marker to draw diagonal lines for folding.
- Create a double fold, following the marked lines.
Pull a Thread
For a neat edge, gently pull a thread along the fabric’s edge. This will help you determine the fabric’s grain and guide your sewing lines.
Rotary Cut
Employ your rotary ruler for precise cuts. The degree cut corners and straight edges ensure a professional finish to your napkins.
Create the Mitered Corners

- With ironed-in creases as your guide, fold the fabric to form a mitered corner.
- Secure with straight stitches, ensuring a nice seam.
- Use a seam gauge for accuracy; 4-5 stitches should be sufficient.
- Repeat for each corner.
This mitering technique transforms an entire square of fabric into a beautiful napkin with crisp edges and bulky corners eliminated.
Iron Creases
As you progress through the project, don’t forget the ironing step. Ironing in the creases helps maintain the napkin’s shape and gives a polished look to your handmade creations.
Pressure Foot and Edger Foot
Experiment with different presser feet to find what works best for you. An edger foot can be particularly useful for achieving those precise seams.
Accessories Colors
Feel free to explore various colors and fabric patterns from your stash. A well-coordinated color palette can turn your napkins into a focal point of your table setting.
Mitering Steps with Instructional Photos
For an extra step, consider adding instructional photos to your sewing guide. Visual aids make it easier for absolute sewing beginners to follow along and achieve beautiful results.
Craft Techniques
While some may find mitering corners a frustrating time, the craft techniques involved are essential for creating polished napkins. Embrace the learning process, and soon this will become your favorite technique for sewing beautiful napkins.
Conclusion
With this mitered corner napkin sewing tutorial, you’re well on your way to creating a delightful set of napkins perfect for any occasion. Whether adorning your brunch table or clearance table, these napkins make exclusive gifts and fun DIY cloth napkins that beat disposable options any day. Enjoy the process of sewing and relish in the satisfaction of having your own handmade, lovely napkins to grace your dining experience.
FAQs – Mitered Corner Napkin Sewing
The choice of fabric depends on your preference and style. Cotton blends, seersucker, and linen are popular choices. Explore your favorite fabric shop for inspiration.
Absolutely! The tutorial provides flexibility in sizing. Whether you prefer 19-inch dinner napkins or smaller lunch napkins, you can customize the dimensions to suit your needs.
es, this mitered corner napkin sewing tutorial is designed with beginners in mind. Follow the step-by-step instructions, and you’ll create beautiful napkins in no time.
Certainly! Feel free to explore various colors and fabric patterns from your stash. Personalize your napkins to match your table setting or create a unique, coordinated look.
Yes, once you’ve completed the project, these napkins are machine-washable. Ensure to follow the care instructions for the specific fabric you’ve chosen.
Mitered corners eliminate bulky corners and provide a polished finish to your napkins. They add a touch of elegance and sophistication to your table setting.

GIPHY App Key not set. Please check settings